Thursday, August 25, 2011

Mom's Zucchini Squash Bread

Mom does not have a concrete recipe for her bread, or anything else really, which is why I also have the habit of estimating all the ingredients by scooping with my favorite measuring cup. Lucky for me, my estimated measurements work out most of the time. Here is mom's recipe, with more exact measurements, including the specific ingredients that I use.

If you are new to growing zucchini, you will soon learn that the squash grows quite large as long as you water it. When I have more zucchini than I can use or give away, I grate it into a very large bowl. Then I measure out about 2 1/2 cups portions into Ziploc freezer bags and toss in the deep freezer for future use. Let it thaw before using in this recipe. Water will separate from the meat in the freezer, so draining the extra liquid will help maintain the quality of the end product.


Mom's Zucchini Squash Bread

1 C. Oil (I use Canola)
3 Eggs
2 C. Sugar (I like using raw sugar, available in the bulk section of the grocery store)
2 C. Grated raw zucchini
3 tsp. Vanilla
3 C. Flour (I like to use Wheat Montana, Gold, it's even available at Walmart)
1 tsp. Baking soda
1/4 tsp. baking powder
1 tsp salt
3 tsp cinnamon (I usually add a little extra)

Optional ingredients:

*1/2 c. nuts, your choice.
*pinch of Nutmeg – something I like to add for winter baking.
*1/2 c. or more crushed pineapple, drained


If you are making 2 standard bread size loaves, preheat the oven to 325.
For half loaf pans, preheat the oven to 350.

Combine oil, eggs, sugar, zucchini, and vanilla in a large bowl. In a separate bowl, combine flour, baking soda, baking powder, salt, and cinnamon. Gradually add the dry ingredients into the wet ingredients until well blended.

Oil your bread pans. Fill each about 1/2 to 2/3 of the way. Full size pans bake for about an hour, half-pans for 45 minutes. Cooking times vary, and will be done when a toothpick inserted near the center comes out clean.  Cool in the pan for 10 - 15 minutes.  Remove from pan and let cool completely on a rack before storing.

Tuesday, August 23, 2011

Lena’s Oatmeal Peanut Butter Brownies

A few weeks ago, I promised my son he could choose a treat, he decided on an inexpensive, boxed brownie mix. When I baked them, I realized that nothing is as good as brownies made from scratch. That inspired me to come up with a new chewy brownie recipe. I like putting a new spin on the classics, making my recipes a little bit healthier whenever possible.  Tonight the oven was on  so I could make a pasta bake for dinner; when the oven is on in the summer, I try to give it as much use as possible.

Note that although I use specific brands; feel free to substitute with more readily available ingredients.  I have found that cocoa powder comes in a variety of flavors, and switching it up will change the flavor of your brownies.  I also like to finish up items in my cupboard instead of throwing it out as I switch to healthier and organic options.

The best photo I could get with a camera phone.


Lena’s Oatmeal Peanut Butter Brownies

Ingredients

• 1 2/3 cups granulated sugar
• 3/4 cup butter, melted
• 2 tablespoons water
• 2 large eggs
• 2 teaspoons vanilla extract
• 1 1/3 cups all-purpose flour
• 3/4 cup cocoa powder (I used medium dark cocoa from The Prepared Pantry)
• 1/2 teaspoon baking powder
• 1/4 teaspoon salt
• 2/3 cup Quaker Quick Oats,
• 1/2 cup creamy Skippy peanut butter, melted.


Directions

1. Preheat oven to 350 degrees F. Grease 13x9-inch baking pan.

2. Combine sugar, butter and water in a large bowl. Stir in eggs and vanilla extract.

3. In a separate bowl, combine flour, cocoa, baking powder, and salt. Stir into the wet mixture and blend well.

4. Stir in oats.

5. Spread into prepared baking pan.

6. Melt Skippy  using a coffee cup in the microwave for approximately 30 seconds.

7. Drizzle peanut butter over the brownie mixture, using a butter knife to swirl it to the bottom and edges.

8. Bake for 25 to 30 minutes or until wooden pick inserted in center comes out slightly sticky. Cool completely in pan on wire rack. Cut into bars.


Tips and suggestions to try:

  • Toss some crushed peanuts in the final mixing stage, or use chucky peanut butter to drizzle on top.
  • If you are using the butter and flour method in the pan, switch out flour and use cocoa powder instead.
  • Add a handful of your favorite flavor of baking chips, or crushed cookies during the final mixing stage, or sprinkle on the top during the last few minutes of baking.*
  • During the last few minutes of baking, remove the pan. Cover the top of the brownies with mini marshmallows and return to the oven until lightly brown (usually only 2-5 minutes).*
  • Add some melted peanut butter to the mix during the final minute of mix time.
  • After brownies are removed from the over, sprinkle powdered sugar over the top.*
*With these options, you can make a design on the top of the brownies for a special treat; stripes, hearts, initials, etc.


Saturday, May 28, 2011

Super Simple Amish Friendship Bread Starter

This is the recipe to make a base for many delicious types of bread. The possibilities for using this base are endless, and well worth the wait. The first batch of bread made with this base will be sweet, but the flavor will change as the base ages.  This is a common recipe for traditional Amish friendship bread, which I learned this one from my sister.


Day 1

In a gallon size Ziploc bag, mix the following.
1 cup flour
1 cup sugar
1 cup milk
Leave on the counter, out of direct sunlight, mixing again once each day for the following 5 days.


Day 5

Add the following, and mix well.
1 cup flour
1 cup sugar
1 cup milk
Continue mixing daily for the next 5 days.


Day 10

Add the following and mix well.
1 cup flour
1 cup milk
1 cup sugar


Your Amish Friendship bread is now ready to use and divide to share with friends.  To turn this into sourdough bread, reserve some base and continue the process again for 10 days.  The longer you keep and maintain this base, the closer it will become to traditional sourdough bread.

Monday, May 23, 2011

Sugar-free Strawberry Refrigerator Jam

Last summer, I started canning again. My husband found a 50 lb. crate of pickling cucumbers at Bountiful Baskets, and the rest is history. Now I like to find ways to use the extra food that we have so that it does not go to waste. This recipe calls for some of my sugar-free applesauce from last season, but store bought will substitute equally.


In early May, when we did not eat the entire flat of strawberries, I came up with a yummy sugar free refrigerator jam recipe. I am STILL missing my memory stick adapter, but I hope it turns up soon so I can add some of the photos I took during the process. This recipe makes enough for you to share with neighbors, depending on what size jars you use (I used old pickle and jelly jars).

What you need.

4 envelopes Knox unflavored Gelatin
2 c. water, room temperature
6 ½ c. strawberries, diced.
1 ½ c. Applesauce from last year’s canning.
¼ cup PureVia Stevia
½ c. lemon juice
Several leftover jars, sterilized.
Canning funnel, optional

Directions:

In a large saucepan, mix water and Know packets. Stir over low heat until completely dissolved. Add strawberries, applesauce, PureVia and lemon juice. Bring to a boil, then simmer, stirring occasionally for 10 minutes.

Spoon mixture into jars, using canning funnel if available. Screw on lids. Cool for an hour then refrigerate. Jam sets overnight.


More about this recipe:

Jam recipes traditionally call for A LOT of sugar. While this recipe must be stored in the refrigerator, it is a much healthier option than traditional jams and jellies. Lemon juice enhances the flavor of the strawberries while the applesauce adds sweetness naturally. I have been experimenting with PureVia recently, and have found it an amazing substitute for traditional sugar. There will be more healthy alternatives recipes to come.

Strawberry Banana Bread Surprise

I have the best photos to go along with this post, but the memory stick adapter has gone M.I.A.  I know many of you have been waiting for this post, among others, so I thought I would go ahead and share my recipe.  I hope to add the photos soon. 

My baby has recently decided to stop eating infant cereal, so I incorporated some of the leftovers into this recipe -- which he will eat.  I hope you enjoy, and please do share your experiences of baking instead of wasting leftovers.

Strawberry Banana Bread Surprise
Makes 3 loaves.


INGREDIENTS:


6 – 8 bananas
2 sticks butter, softened
1 c. brown sugar
½ c. sugar
5 eggs
2 c. strawberries, diced
2 tsp. baking soda
3 c. all purpose flour
1 c. infant oatmeal cereal (I used Beechnut)
3 T. milk, as needed


DIRECTIONS:

1. Preheat oven to 350 degrees F. Lightly grease 3 9X5 inch loaf pans.


2. Mix flour, infant cereal, and baking soda in a bowl and set aside. In a large bowl, smash the bananas. Add softened butter, sugar, brown sugar, and mix well. Add eggs one at a time until well mixed. Slowly add flour mixture, until combined. Finally, gently stir in diced strawberries. Pour batter into greased bread pans.


3. Bake in preheated oven for 60 – 70 minutes, until a toothpick inserted in the center comes out clean. Let bread cool in pans for at least 10 minutes and then turn out onto a wire rack. Be sure bread is completely cooled before storing, or the humidity will cause bread to become soggy. After cooling, I usually place them in an open bread bag for the first 24 hours, before sealing bag.


Sunday, January 16, 2011

Lots of Love for Locks of Love.

For a couple of years now, I have wanted change.  For one reason or another, I never chopped my hair off completely. I did cut off about 12 inches several months ago, but that still left me with about 3 feet of hair. Today, I finally did it; I cut off over 12 inches. This is one small thing that can benefit people in light of everything that has been happening to those that I love. My hair is going to make a wig for a child who has long term hair loss.


That's my new hairstyle in the corner of the book!

Locks of Love is a place that helps to build the self esteem of children who have long term hair loss for a variety of reasons. There are more details on the Locks of Love website. This program is specifically for financially disadvantaged children, so some details are kept private. What I do know is that chopping off my hair felt a whole lot better knowing that in a few months a child is going to smile because of me. Love to you little boy or girl. I hope that I keep you smiling for months.

Wednesday, January 12, 2011

Part two - Crib bumper to teething rail.

Finally. Part two of Crib bumper to teething rail in 5 minutes or less. Thank you everyone, for waiting on me while I took a few days to let my neck and arm rest up. The extra time did show me how much my baby-o loves to chew on this. He now hangs out in his crib after nap time, just chewing on the bumper, sometimes for an hour or more. I think this is a winner creation. I did decide to modify my original design plan since he likes it so much just the way it is. But I will still show you how to add more ties if you would like to add more to your own design.


Back to the how-to’s. While the bumper was still tied to the crib, I took a pencil, and marked where it met the back side of the crib, so I would know where to cut.

There are not special measurements. I just suggest that after you have tied the bumper onto the top rail (part one of this tutorial), that you leave yourself a couple of extra inches to work with. You are almost ready to start cutting. 
My bumper has a nice binding going all the way around it. I cut through the bottom binding and on up until I had almost reached the top binding. 

Then I got out the fancy stitch cutting tool that came with my sewing machine. I cut the stitches that were holding the binding to extra fabric I had previously cut away.

You are going to want to leave yourself enough binding to reattach and close to the open edge.

Save the extra material if you plan on adding more ties, or if you want to add a matching length across the back of your crib. I notice that my baby's crib does look a little bare in the back with the padding only along outer 3 edges.
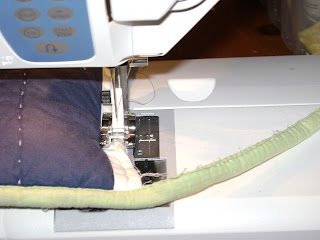
Once the scraps are cut away, you want to go back and thin out the edge you are going to be sewing. I have a pretty thick layer of batting in mine, so I cut it about ½ inch of the inside filler only. This makes the job of adding binding easier. Start to sew the raw edge closed.  I used a straight stitch.  This is for strength, we'll add the binding next.

Sew the raw edge, not the binding, remember to back-stitch to secure.
Okay here’s my little disclosure, I broke a few needles while machine sewing this, that’s why I say to cut back the batting. If you are also using a machine, be sure you use a heavy gauge needle. I have never broken a needle before, but the 14 that I was using snapped, twice. Maybe try a 16 or even an 18 if you have one. 

The binding,  I only know how to explain attaching it by showing you.  I folded the corner, and started to sew.  Notice how I held the corner, that’s exactly how I put it under the presser foot.  You could hand sew this for a little cleaner look, it will just take you more time.  You could also pin it into place.  I don't like to pin, so I just straightened it as I sewed.
Don't forget to back-stitch the beginning and the end for safety.

Not my cleanest work, but I was done fighting my machine at this point.
Do you absolutely hate binding? I know I still struggle with it, that’s why I machine sew both sides. If you want an even easier fix, you can just fold the edge of the fabric in on itself, and do a nice zigzag stitch to close up the edge. I think a serger would also work nicely since this is not an easily visible edge.  I do not use one myself, but they do make a pretty clean edge in much less time than adding binding.


I decided that since Christian likes to chew on the new teething rail so much, I would not add more ties. He likes to chew on the loose, inside edge; my strange little guy. He has never been able to pull any of the existing ties loose in the week that we’ve been using this, so I feel confident that he is safe. Cutting off the extra length just makes for a cleaner look then leaving it hanging behind the crib. If you would like to add more ties, they are easy to make, and can be made using the extra scrap that you just cut off. Check out the mini tutorial at the bottom.

The finished product.
I tied with a simple square knot instead of a bow for fun this time.


So you want to add some extra ties to your teething rail? Here’s how you do it. Use some of your scraps. Cut about an inch wide strip from the narrow end. Cut enough to add two ties to each area you want to add a tie to. You can completely avoid pinning by using a hot iron and spray starch.  I recommend doing it that way.  My quilting sister taught me this trick.  Next you want to fold them in half length wise.

This band-aid is not a sewing ouch, but it is making typing difficult.
 Iron to hold the crease. Unfold the crease. Now take your rough edges and fold them in to the crease you just ironed in.
If you iron these down, and fold again your rough edges will be tucked safely into the fabric.
To finish the narrow ends simply fold them down into themselves and sew. It’s easy to run along your outside edge with the sewing machine on the three open sides. I almost never pin when I sew. I am a combination of sister/self taught, so I know that I do not follow any of the sewing rules professionals use.

To add your new ties to the teething rail, just line up the narrow edge to where you want it and do a zigzag stitch.  I also recommend using a very short stitch.  That will help to secure it tightly so your baby cannot pull it off. Finally, don't forget to back stitch.  That is what locks your work in place, and keeps your baby safe.

Thursday, January 6, 2011

3 Tiny Blessings

A shop worth mentioning.


A few weeks ago, I won a beautiful blanket and appliquéd burp cloth set from 3 Tiny Blessings. I have to say, when I get something for free, I usually don’t expect much. I have to say how happily surprised that I was when the package arrived.


First of all, the blanket and burp cloth arrived wrapped very nicely with a matching grosgrain ribbon, as if I were receiving it as a gift. It is always a nice surprise when someone takes the time to package something like they would want to receive it. It shows that they care about their customers. I spent several years in business management and development, so I have to say that I can tell the difference between doing the minimum, and going the extra mile. Vickie at 3 Tiny Blessings goes the extra mile.


On to the good stuff. Love the blanket. It measures 39” x 40” just like in the original description. I have an experienced quilter in my family, so I know good work. This is good work. Straight, neat stitching, on the handmade binding (that’s the pink around the edges). The blanket is light weight; Pink flannel on one side, and patterned cotton on the other. This means it can be used year round in all climates. Those of us in the cold parts of the country know how to bundle a baby, but our warm neighbors can also use this to block the sun without overheating baby. That is always a good thing!


The burp cloth makes me want my daughter to be a baby again! Vickie took the same care on this binding. I have to say that making curved edges is not an easy thing to do, but she makes it look like it is for her. The flower appliqué is made using the same pink flannel as the blanket plus a coordinating green flannel leaves, and white flannel flower center. The stitching is noticeable is intended to enhance the design. This blanket is way cuter in person then either my photos or the one on 3 Tiny Blessings Facebook Page.

I am loving the matching business card, too.


Best of all, I am giving this blanket to the next person who I have to come up with a baby girl gift for; that means you Caysie! I hope you love it as much as I do.

Tuesday, January 4, 2011

Crib bumper to teething rail in 5 minutes or less!

Today I am crafting for Christian.  He is the first of my four children who has decided to rub his teeth on his crib railing. I guess this make me lucky?  His poor little face is getting splinters, and even worse, he is eating the chemical laden wood finish; that cannot be healthy.  I originally thought to look for one of those clear, plastic teething bars to snap on the top rail.  Our problem is that our crib has a wider railing than most cribs, so the few things that I can find, are not going to work.  I don’t really want him chewing on mystery plastic anyway.  While I tried to sleep last night, I thought to myself, I will just repurpose his bumper pad!

See the red marks from splinters.  Ouch!
If you were unaware, bumper pads have been linked to SIDS.  Take a look at My Precious Kid Child Safety Blog for details on safe sleeping; it is loaded with great information.
You can link to her store toward the bottom of that information.  Here is the link to the breathable bumpers if you want to get straight to the breathable bumper.  They are dedicated to child safety and amazing customer service. (Anyone else fed up with big box stores?) 
Okay, back to changing your crib bumper to something useful.  It is almost nap time, so I came up with this quick fix.  I do plan on making some adjustments later in the day, I just had to put an end to the eating wood finish this very nap.  I simply took the bumper pad and tied it to the top rail of the crib, starting on the left back corner. 
Bumper pads have two rows of ties; one along the top length, and one along the bottom length.  I placed the bumper pad over the top rail, pulling the narrow edge around it. 
At each pre-attached tie, I knotted what used to be the top two with the bottom two. I used simple knot, like tying your shoes, because I plan on taking this off later to make some adjustments. 
Continue this all around the crib.  If your crib is not standard (taller in the back), the new teething pad will not make it all the way around.  I squeezed the excess behind the crib for now, but I have ideas coming soon.

Here is what is coming up when baby is awake, and I have a few minutes free (this means when daddy is home):
I am going to cut the extra off, and add some new ties so it fits even more tightly against the railing.  ~SAFETY FIRST~ If you are going to attempt this before my new post with directions, please keep in mind that your baby will likely be pulling at this, and chewing on it.  Only use child safe fabric, and sew securely.  It is far better to have an ugly seam than to have your baby choke; that extra back stitch or two will not hurt anyone.

Part Two Is Finally Here!  Just follow the link for the details!

Monday, January 3, 2011

Teacher Gifts

For Christmas this year, I had a bunch of fresh foods in mind.  However, when the flu stuck our house the week before Christmas break, I did not dare ask anyone to eat food from our house.  Closer to Christmas, when everyone was healthy, I did give out baskets of freshly baked bread and homemade jams and jellies to our close friends and loved ones.  What does that have to do with teachers?  I baked for an entire week, and pretty much decided I had to come up with something different for the teachers. 
What to do?  I found inspiration at Kojo’s Designs blog.  Check out what they did.
They made some gorgeous yard wrapped letters.  I went to the craft store, but found myself wandering around as there really was nothing useful for my concept.  When I was about to settle for the wrong thing just to leave the store, divine intervention happened;  Miss Caitlyn had to use the big girl potty NOW.  We ran to the restroom.  On our way out, I came across these fancy looking letters made from small bells.
AHA! Intervention/Inspiration!  I picked up one representing the first letter of each teacher’s last name. Yes, my 3 kids have 8 main teachers.  After I got home, I realized I had forgotten Ms. Jill, the art teacher, and part of my inspiration.  Gasp.  Jill, if you are reading this, I so owe you something handmade, let me know if you see something in this blog that you like and I will customize it for you. J

Now that I have these cool letters home, what to do with them.  I dug through my craft stash, and decided that they needed flowers.  Not just any flowers, but fabric flowers.  So I whipped up a batch of assorted colors and designs.  Honestly, I got sick of working with yellow, so I started to add the pink.  Once I had 8 flowers, I went back to my accessories box played with the embellishments to complete the centers.  I hot glued the center of the flowers and then hot glued them onto the letters.  Easy peasy. 
You may notice that I have 3 M’s.  I decided to wrap them up and just put a little note on each corner so I did not get the letter confused.  I use plain, white freezer paper (I love freezer paper!), and ribbon scraps to wrap them.  Cute, sweet, and only a week late.

Funky-Furry Valentine's Shirt.


You will need:  
  • Any plain shirt.  I used Caitlyn’s stained shirt; it's cotton, size 3T.
  • Freezer Paper.  Find this by the sandwich bags and the grocery store.  This is a huge roll, and will last a very long time.  It is seriously worth the money, I think I paid $9.
  • Pencil
  • Scissors
  • Fun fabric of your choice.  I used some super soft furry stuff from my stash.
  • An Iron
  • Pins
  • Your sewing machine, although you could do this by hand if you are that ambitious.


What I did:

First, I went to my clip art file, and found a heart.  You could draw one free hand, if you prefer.  I picked the one that jumped out at me, a short, fat, squeezable heart.  I suggest you pick the one that speaks to you.  When you print, you can adjust your settings to save ink depending on your program.  All you really need is the outline of your design.
Plug in your iron to warm it up.  I used a medium setting (4), but my temperature dial magically disappeared, so I do all my crafts on this setting.  Then, I traced the heart on to the freezer paper.  The shiny side is waxed, so flip it over, and trace on the regular paper side.  If you want to draw your own image, you could do it right on the freezer paper.

I cut a bit of a cardboard box to put inside the shirt to make my job easier.  I gave the shirt a quick iron to get rid of the wrinkles.   Cut your image out of the freezer paper.  Put the cut out on your shirt, shiny, waxed side down.  Line it up on the shirt where you want it.  I just placed it in the center, and when it looked good to me, I called it perfect.   Now go over it with your iron.  The wax will stick to the shirt, creating a temporary but strong bond to the shirt.  If you use your iron for anything besides crafting, I suggest that you put a pillowcase, or some other thin fabric between the pattern and your iron.  This will keep you from finding any surprises on your white dress shirts later on.  You are done with the iron, so unplug it, and put it somewhere safe so you don’t burn yourself.

Take out the cardboard, turn the shirt inside out, and put the cardboard back in (this makes pinning easier).  Cut enough fabric to cover your design, giving yourself at least an inch of extra on all sides.  You will trim the extra off later.  Pin your fun fabric to the shirt.  Remember, you will be pinning the right side of your furry fabric to the wrong side of the shirt.  I used a lot of pins on this one, and just removed them as they were in my way later on.

Take out the cardboard and turn your shirt right side out.  With the paper facing up, sew all around the design.  I used a straight stitch on pass one, followed by a zigzag stitch.  Remember, the idea is for this to be imperfect. If you go over the paper, it’s no big deal, tear off later.  Just be careful to not catch the backside of the shirt as you sew around your design.  You will probably feel the change of thickness it if you do.  If that happens, just pull the stitches back to the mistake, and start again. Be sure to connect the stitches, and backstitch to secure your thread.  After a couple of passes, you are done.

Now is the fun part.  Peel off the paper. 
You can see your stitch work, but not the furry fabric now.  Cut the shirt part out of the center of the stitched heart.  I found it easier to start with the tiny scissors that came with my sewing machine.  Start in the center and pull up the shirt from the back fabric.  Cut a small hole. Be careful not to cut through the furry fabric on the inside.  Keep cutting away the fabric using whatever method is the easiest for you.  You want to get about 1/8” from the outline stitches.  Just be careful not to cut into your sewing. 

Once the front is cut, turn the shirt inside out again, and cut off the excess furry fabric.   I left about 1/4 inch all around. 

You are done!  Turn the shirt back the right way. 

You could embellish the design with fabric flowers or buttons if you wish; they are a great way to hide little mistakes.  I think the furry heart is fabulous by itself.  Best of all, Caitlyn loves her new shirt.

Sunday, January 2, 2011

Day One - starting the blog.

I have been a crafter my entire life, and I am also very lucky to have some very talented friends and family, too.  After thinking about blogging for years, I decided that it is finally time to share my ideas and my finds with others.  I am still recovering from a couple of automobile accidents, so I have slowed down quite a bit.  I will share what I can, and also plan on soon offering a few of my custom crafts on Etsy.  Thanks for stopping by my blog, please check back often.   I have several projects underway (with photos) to be posted soon!  Please tell your friends about me, and follow me on Facebook.